Quickstart
Welcome, Extempore traveller. If you don’t have a favourite text editor or don’t usually build things from source (or don’t know what those things even mean) then these instructions will get you up & running asap.
This quickstart guide is based on VSCode. If you’d prefer to use another editor (e.g. Emacs, Atom, ST, Vim) then that’s fine as well—these boxes will explain how your setup process will be different.
With everything on this page, if you run in to problems make sure you check the Troubleshooting section at the end.
Setup
Here’s the stuff you only need to do once.
Download & set up VSCode
VSCode (a.k.a. Visual Studio Code) is freely available on all the operating systems that Extempore runs on (macOS, Windows & Linux). To install VSCode, go to the homepage and hit the big “Download” button (you can’t miss it). Once you’ve installed VSCode, you need to install the VSCode Extempore extension—this tells VSCode how to deal with Extempore code.
Open the Command Palette, type in a few characters of the command Extensions: Install Extensions until it shows up, then hit return. Then, search for “Extempore” and install the extension.
The main way to run commands (in other words, to “do things”) in VSCode is
through the Command Palette, which you can open up with
ctrl+shift+P (or through the menu View >
Command Palette...).
Download Extempore
If you’re on Windows or macOS then VSCode has an Extempore: Download binary command which will download & set up Extempore for you (again, access it through the Command Palette). It’s about a 300MB download, so it might take a while, but when it’s done you’re good to go.
If you want to download the binary yourself it’s also not tricky, just get the latest version from the GitHub releases page, unzip it and put it wherever you like (e.g. in your Documents folder). It’s also a good idea to set the Extempore: Sharedir VSCode config setting to point to the place where you put your Extempore folder—this will allow VSCode to easily start Extempore for you (as we’ll see in the next step).
Using Extempore
Here’s the stuff you need to do every time you want to work with Extempore.
Step 1: start Extempore
You can start Extempore using the Extempore: Start command (again, you can
find this command using the command palette). It’ll
open up a terminal, cd into your extempore folder, and start the Extempore
running. If you see something like this, everything’s working—nice one.
------------- Extempore --------------
Andrew Sorensen (c) 2010-2020
andrew@moso.com.au, @digego

ARCH           : x86_64-apple-darwin18.7.0
CPU            : broadwell
ATTRS          : -sse4a,-avx512bw,+cx16,-tbm,+xsave,-fma4,-avx512vl,+prfchw,+bmi2,+adx,+xsavec,+fsgsbase,+avx,-avx512cd,-avx512pf,+rtm,+popcnt,+fma,+bmi,+aes,+rdrnd,+xsaves,+sse4.1,+sse4.2,+avx2,-avx512er,+sse,+lzcnt,+pclmul,-avx512f,+f16c,+ssse3,+mmx,-pku,+cmov,-xop,+rdseed,+movbe,+hle,+xsaveopt,-sha,+sse2,+sse3,-avx512dq
LLVM           : 3.8.0 MCJIT
Output Device  : Studio 24
Input Device   :
SampleRate     : 44100
Channels Out   : 2
Channels In    : 0
Frames         : 1024
Latency        : 0.0254195 sec
Primary        : thread 0
---------------------------------------
INFO: starting utility process...
INFO: server: accepted new connection to utility process
INFO: client: connected to server utility process at localhost:7098
INFO: starting primary process...
INFO: server: accepted new connection to primary process
INFO: client: connected to server primary process at localhost:7099
Loading xtmbase library... done in 1.633086 seconds
If you can’t (or don’t want to) start Extempore using the Extempore: Start
VSCode command, then open a terminal in your Extempore directory (VSCode has a
built-in terminal which you can bring up with CTRL+`)
and type ./extempore (or .\extempore.exe if you’re on Windows—note the
backslash instead of the forward slash) and hit return. Extempore
supports a bunch of command line options—try ./extempore
--help/.\extempore.exe --help to see the full list.
Step 2: connect your text editor
Extempore is now just sitting waiting for you to tell it what code to execute. Before you can do this, you first need to connect your text editor to the running Extempore session. In VSCode, you do this with the Extempore Connect command.
Starting primary process
Trying to connect to 'localhost' on port 7099
New Client Connection
Successfully connected to remote process
Loading xtmbase library... done in 1.505913 seconds
New Client Connection
If everything’s gone to plan, you’ll see one more message at the very bottom of the terminal:
INFO: server: accepted new connection to primary process
Congrats, you’re connected… and almost there.
Remember, if you’re not using VSCode, all the concepts are the same, but the names of the commands or the keyboard shortcuts might be different—I’m sure you’ll manage 😉, and you can find the specific details for your editor in the editor support guide.
Step 3: evaluate some code
To evaluate some code, move your cursor into a particular bit of code and hit ctrl+return. The code should flash orange, and you should see/hear the results (assuming that the code actually made some noise or printed the result somewhere).
As a quick test, try and evaluate something like:
(println "Hello, World!")
If you can see "Hello, World!" at the bottom of the terminal, then you’ve just
evaluated your first Extempore code! 🙌 🎉 🥳 🙌
  INFO: starting utility process...
  INFO: server: accepted new connection to utility process
  INFO: client: connected to server utility process at localhost:7098
  INFO: starting primary process...
  INFO: server: accepted new connection to primary process
  INFO: client: connected to server primary process at localhost:7099
Loading xtmbase library... done in 1.633086 seconds
INFO: server: accepted new connection to primary process
"Hello, World!"
Try modifying the code and re-evaluating it—the code is live, so you can change and re-evaluate things without having to re-start Extempore.
One “gotcha” if you’re new to this sort of thing is the difference between the
return value of a function and any side effects that it triggers. In the
above example, the “Hello, World!” which you saw in the terminal is a side
effect (making a sound through the speakers would be a side effect as well). The
actual return value of the println function is the value “true” (which is
represented as #t in Extempore).
This is just a quickstart, so we won’t go down the rabbit hole, but the rule of
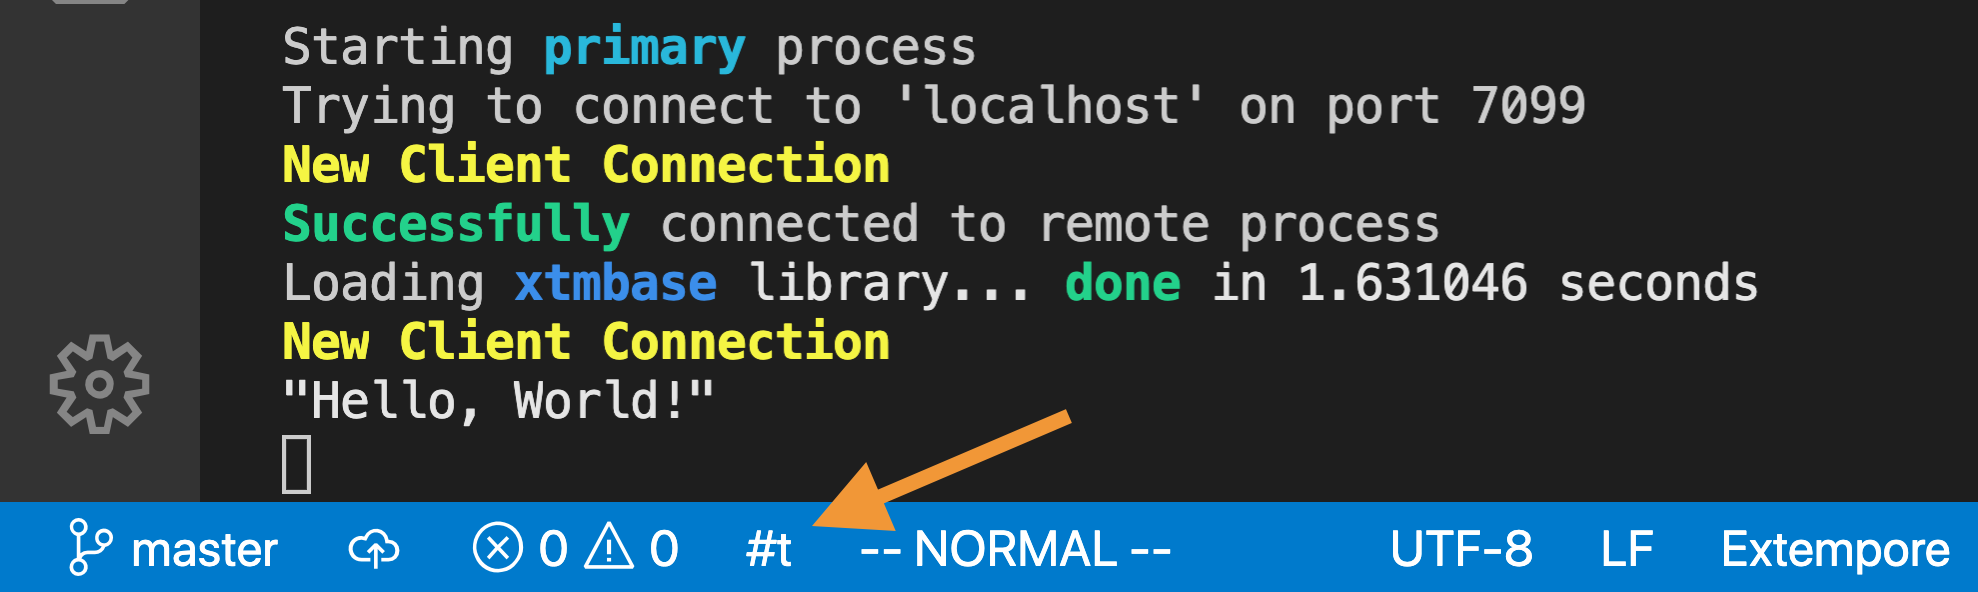
thumb is that when you call a print function (e.g. println)
- the printed output will show up in the terminal
- the return value of the function will be shown (temporarily) at the bottom
of your VSCode window like so (notice the little white
#ton the blue background—I’ve added an orange arrow to point it out).
Step 4: stopping Extempore
If you want to stop the Extempore process, just ctrl+c in the terminal where extempore is
running to kill it. If you want to start it up again, then go back to step
1 (you’ll have to re-connect VSCode to the new Extempore process again
as well).
Simple examples
“Hello, Sine!”
Since Extempore has multimedia programming as a core part of its DNA, here’s “Hello, Sine!”
(bind-func sine:DSP
  (lambda (in time chan dat)
    (* .1 (cos (* (convert time) .04)))))

;; tell Extempore to use `sine` as the audio output sink
(dsp:set! sine)
If you want to turn it off, just re-define the dsp function to return
“silence”:
(bind-func sine:DSP
  (lambda (in time chan dat)
    0.0))
In the code above we’ve used 0.0, but any constant value will work (because
physics).
Hello scale
If you’re more interested in playing “notes” than doing lower-level DSP stuff, then there’s an Extempore library which is designed to get you up and running quickly with a couple of synths & samplers.
Here’s a one-liner example (using Extempore’s built-in pattern language) of how to
;; need to load this first, but only once
(sys:load "examples/sharedsystem/setup.xtm")

;; then, this will trigger an 8-note "ascending scale" loop starting at middle C
(:> ascending-scale 4 0 (play syn1 @1 80 dur) (scale 4 8))
Feel free to play around with (and re-evaluate) some of the parameters in that
ascending-scale and try and figure out how it all fits together, and when you
want to go further check out the pattern language guide.
Beyond “Hello…”
These simple code examples gloss over some subtleties of what’s going on. But hey, if you’ve managed to get started quickly(ish), then this Quickstart page has done its job. To understand the subtleties, well, that’s what the rest of the documentation is for 😊
Troubleshooting
When you’re chewing on life’s gristle
Don’t grumble, give a whistle
And this’ll help things turn out for the best
All platforms
No sound? Check your audio device
Most of the time Extempore will guess the correct audio device, but not always. So if you’re not getting any sound, it could be because Extempore is sending sound output to the wrong audio device.
To print the list of audio devices that Extempore can “see”, open a terminal and
type the command ./extempore --print-devices (or ./extempore.exe
--print-devices if you’re on Windows) and hit return. On my machine
right now it says this, but yours will (almost certainly) be different.
-----Available Audio Devices-----------------------------
audio device[0]:DisplayPort api[0]:Core Audio inchan[0] outchan[2]
audio device[1]:Studio 24 api[0]:Core Audio inchan[2] outchan[2]
audio device[2]:HD Webcam C615 api[0]:Core Audio inchan[1] outchan[0]
audio device[3]:BlackHole 16ch api[0]:Core Audio inchan[16] outchan[16]
audio device[4]:MacBook Pro Microphone api[0]:Core Audio inchan[1] outchan[0]
audio device[5]:MacBook Pro Speakers api[0]:Core Audio inchan[0] outchan[2]
audio device[6]:ZoomAudioD api[0]:Core Audio inchan[2] outchan[2]
----------------------------------------------------------
If you do want Extempore to use a particular audio device, you can pass either
the device index or the device name through an additional option. For example,
if you want Extempore to use the MacBook Pro Speakers, either of these would
work (again, remember to use ./extempore.exe if you’re on Windows):
./extempore --device 5
./extempore --device-name "MacBook Pro Speakers"
The order of your audio devices can change at any time, especially when you’re
plugging and unplugging devices. So the device number (i.e. the 5 in the
example above) won’t always correspond to the MacBook Pro Speakers. In a gig
situation it’s always safer to use --device-name to be sure that you’re using
the correct audio device.
Glitchy sound? “Audio underflow” warning messages in the terminal?
Especially if you’re using the sharedsystem (e.g. in the “hello scale” example above), it’s actually kindof heavyweight1 (or at least medium-weight) from a CPU use perspective. It loads up 4 analogue synths and a sampler, plus some FX (e.g. global convolution reverb) and tries to distribute them across multiple cores on your machine.
If you’re getting lots of “audio underflow” messages, you’ve got a few options, in order of easiest fixes to most difficult:
-
don’t run any other software on your machine that you don’t absolutely need for the gig
-
try starting Extempore with a larger frame size (e.g.
./extempore --frames 8192) -
if you don’t need MIDI I/O, just load
(sys:load
"examples/sharedsystem/audiosetup.xtm")
instead of(sys:load "examples/sharedsystem/setup.xtm") -
remove some of the
dspN(forN= 1..5) functions from the signal chain inexamples/sharedsystem/audiosetup.xtm(e.g. if you’re only usingsyn1andsyn2you could removedsp3from the signal chain, which usesdspmtas the final output sink) -
try doing it on a beefier machine (not an option for many people, obviously)
If you go with option #4, remember that you can create a new copy of
audiosetup.xtm and modify it to your heart’s content. Even if you’ve just been
messing with the original audiosetup.xtm file directly, remember that you can
get a “pristine” version at any time from
GitHub.
Windows
VCRUNTIME140_1.dll was not found
Windows users: if you ever see the error message VCRUNTIME140_1.dll was not
found, then you’ll need to download the x64 vc_redist.x64.exe—make sure you
get it from the official Windows
website,
because there are lots of sketchy places on the web which will try and get you
to download theirs, and who knows what they’ve done with it?
-
I mean, it’s still supposed to work on a half-decent laptop—it shouldn’t require a real beast—but if you’re on a particularly old/wheezy machine then even with the below tricks the sharedsystem might not be a good choice. The other examples (e.g.
examples/core/fmsynth.xtm) show how to create a lighter-weight DSP chain, and from there you could add only the instruments & effects that you need. ↩